Gated Models
Gated models
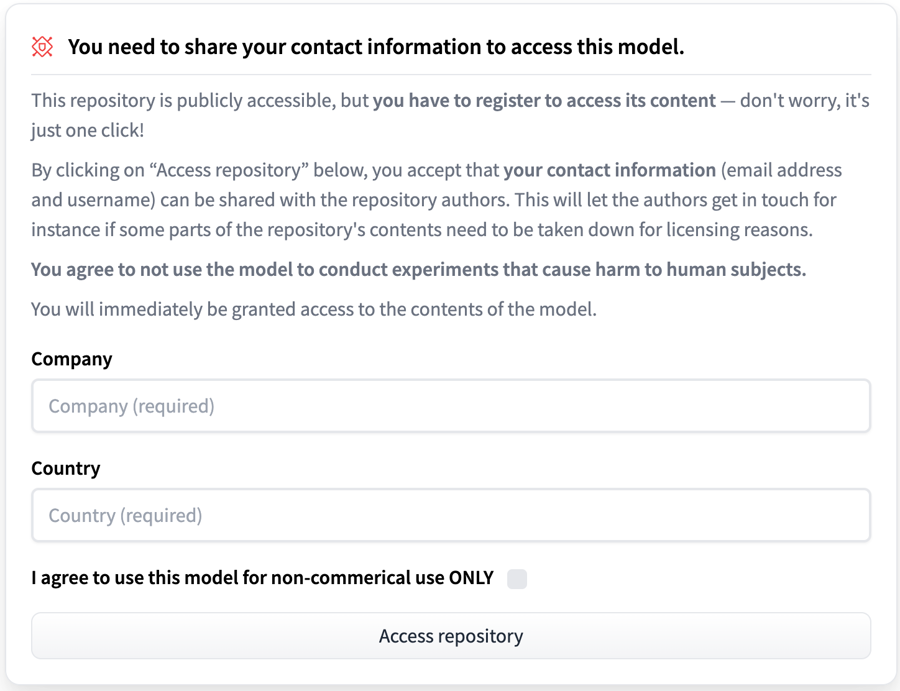
To give model creators more control over how their models are used, the Hub allows users to enable User Access requests through a model’s Settings tab. Enabling this setting requires users to agree to share their contact information and accept the model owners’ terms and conditions in order to access the model. The contact information is stored in a database, and model owners are able to download a copy of the user access report.
Note that to download a gated model you’ll need to be authenticated. You can log in by installing the boincai_hub client library and running the following in your terminal:
Copied
boincai-cli loginIf you’re using a Jupyter or Colaboratory notebook, log in with the following Python command
Copied
from boincai_hub import notebook_login
notebook_login()
Then, ensure that your library uses the token. This is now the case by default in boincai-maintained libraries.
However, on older versions of libraries, for example if using 🌍 Transformers with a version of boincai_hub older than v0.10 you’ll need to pass use_auth_token=True when calling .from_pretrained().
Modifying the prompt
The User Access request dialog can be modified to include additional text and checkbox fields in the prompt. To do this, add a YAML section to the model’s README.md file (create one if it does not already exist) and add an extra_gated_fields property. Within this property, you’ll be able to add as many custom fields as you like and whether they are a text or checkbox field. An extra_gated_prompt property can also be included to add a customized text message.
Copied
---
extra_gated_prompt: "You agree to not use the model to conduct experiments that cause harm to human subjects."
extra_gated_fields:
 Company: text
 Country: text
 I agree to use this model for non-commercial use ONLY: checkbox
---
The README.md file for a model is called a model Card. Visit the documentation to learn more about how to use it and to see the properties that you can configure.
Manual approval
By default, requests to access the model are automatically accepted. Model authors can set the approval mode to “Manual reviews” from the model’s Settings tab. Doing so enforces that each access request will be manually reviewed and approved by the model authors. Only users whose access requests have been approved will be able to access the model’s content.

You can automate the approval of access requests with the following API:
GET
/api/models/{repo_id}/user-access-request/pending
Retrieve the list of pending access requests for the given model.
headers = { "authorization" : "Bearer $token" }
GET
/api/models/{repo_id}/user-access-request/accepted
Retrieve the list of accepted access requests for the given model.
headers = { "authorization" : "Bearer $token" }
GET
/api/models/{repo_id}/user-access-request/rejected
Retrieve the list of rejected access requests for the given model
headers = { "authorization" : "Bearer $token" }
POST
/api/models/{repo_id}/user-access-request/handle
Change the status of a given access request to status.
headers = { "authorization" : "Bearer $token" } json = { "status": "accepted" | "rejected" | "pending", "user": "username" }
POST
/api/models/{repo_id}/user-access-request/grant
Allow a specific user to access your repo.
headers = { "authorization" : "Bearer $token" } json = { "user": "username" }
The base URL for the HTTP endpoints above is https://boincai.com. The $token to pass as a bearer token can be generated from your user settings. It must have write access to the gated repository.
Notifications settings
By default, notifications for new pending access requests are sent once a day via email. When the repo lives in an organization, those emails are sent to the first 5 admins of the organization.
You can customize the way you receive those notifications from the gated model’s settings page. You can choose whether to receive notifications for new pending access requests in bulk once a day or in real-time. You can also set a custom email to send those notifications to.

Additional Customization
In some cases, you might also want to modify the text in the heading of the gate as well as the text in the button. For those use cases you can modify extra_gated_heading and extra_gated_button_content.
Copied
Last updated